
Welcome back for another jam packed blog post!
Let's dive in...

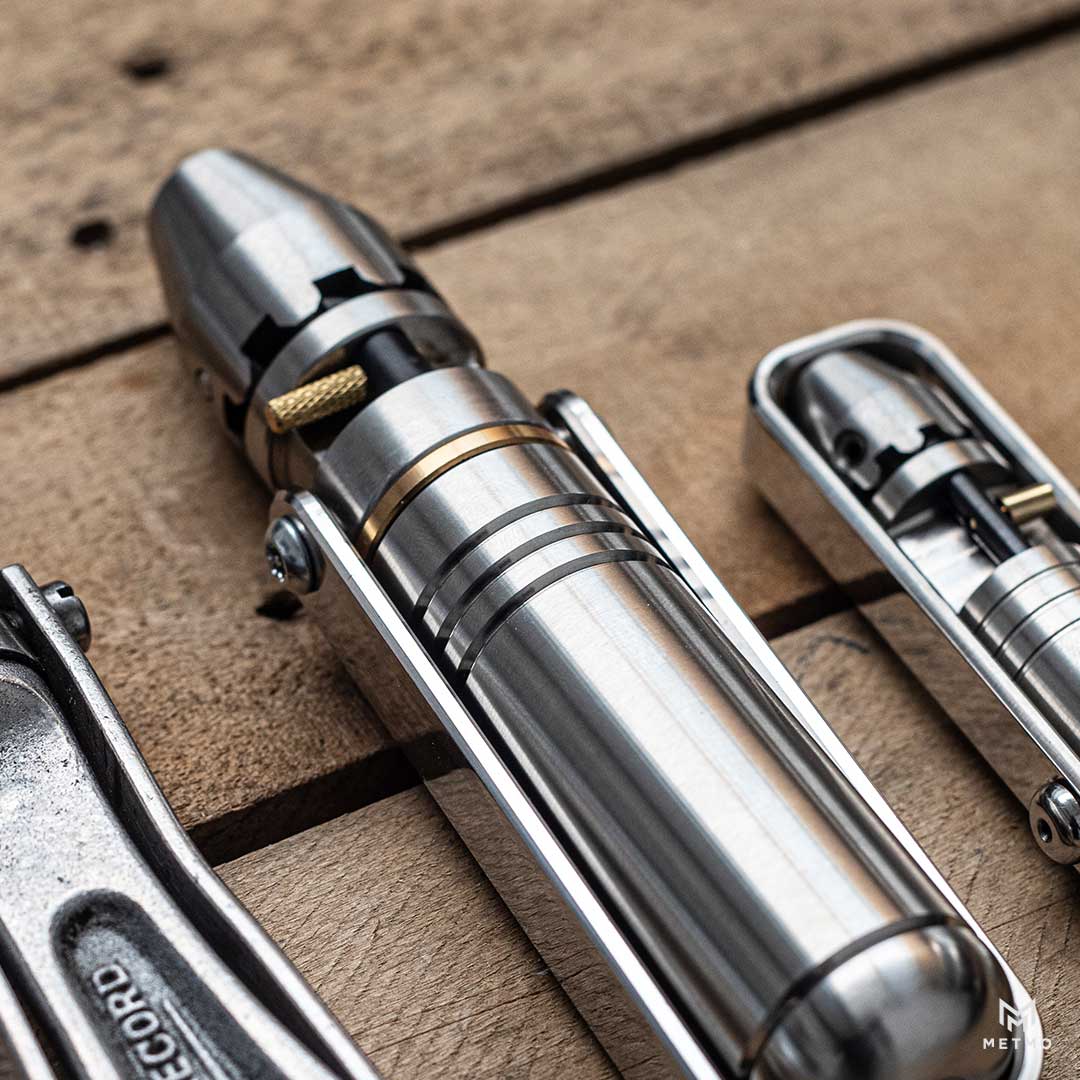
Main Body
The Main Body of the Pocket Driver
This part is one of the largest and most complex to machine, although not visible from this camera angle the inside is hollow to allow for the bit storage and there is also a precision reamed hole for the pin to be housed in. One of the big challenges on the Pocket Driver has been making the mechanical parts small enough to fit in a compact space but also not be too fiddly to actually use. For example, the flat section that cuts through the body is not actually flat but tapers from the centerline of the product so that when the reciprocating pin is in that space, it sits just above the surface so you can still get to it, even with big thumbs!
Pictured is the stainless steel part so you can see the machining easier, but the design is the same throughout the aluminium body versions too. Most of this part is made on a CNC lathe with a milling attachment that comes in to create the cutouts.

Chuck
The Almighty Chuck with 10 Castellations
First broached to create the hexagon hole, before the other turning processes to create the rest of the part. The machining is all done before the part is hardened through a heat treatment, where the part is heated in a kiln to a precise temperature then cooled quickly. We use a special grade of stainless steel for this so that the hardening of the part is not just on the surface but runs the whole way through the component, so we can surface finish it afterwards to make it look good again. This process makes the part hard to machine after, so it is really important that we make the parts correctly beforehand.
The castellations have a copper oxide spray treatment that acts as a long lasting lubricative surface and protects the parts as they move against each other, ensuring wear is kept to a minimum and making the Pocket Driver last for generations.

End Cap
This Is Our Happy Little End Cap
One of the new additions to the design of the Pocket Driver from the original Driver. Technically there are two parts in this image, the end cap and the stainless steel ball plunger that is press fit into the end. Unfortunately at the time of making this we had pressed all of the plungers into the end caps we have and it's a one way process! But if you want to see the parts separated you can see it in our making of video in our How to Make a Pocket blog post.
The ball plunger is a an off the shelf part normally used in machinery, but in the Pocket Driver it's what holds the handle in place and provides some really satisfying clicks as the handle is released.
The screw thread on this part is a custom coarse thread, designed to make it quick to screw on and not get cross threaded and jam. Also, a subtle feature with it is that it locks up so it doesn't come undone in your pocket, but is also free enough so that it doesn't seize or do up too tight and you need an Iron like grip to release it. No gherkin jar releases needed here!

The Grub Screw Strikes Again!
Technically a Dog Point Grub screw as it has the end on without a thread. This part keeps the chuck on the spindle of the main body of the driver. This has been cleverly designed so that in use it is not actually in contact with any part of the driver so there is no load or wear on this part at all. It is only when a drive bit is pulled out of the chuck that this little guy comes into action stopping the chuck from coming off... that would be somewhat inconvenient!
This odd size small part is made especially for us to fit the very exact measurements needed to so that it can fit the tight dimensions of the chuck.

Handle
The Handle
We went into a lot of detail on this particular part in Cutting Edge Blog Post looking at how it is machined on an industrial scale, so I suggest you check that out if you haven't already.
The handle was originally going to be the same formed sheet metal as the original, but we decided for a more precision approach on this handle. Because this is a continuous loop, although thin in some points, it allows the stress to be better distributed and at the same time allows for your hand to get more purchase and force behind it in a more comfortable way than just having a single arm.
This was one of the parts we spent the most time on, as we were concerned about the strength in such a small form factor, but it turned out to be one of the strongest parts that has not failed at any point during testing.

Shoulder Screws
Shoulder Screws
The humble screw. How on earth do you make this interesting I hear you ask! Well these are no ordinary screws, on our journey we are now at the point where we are able to start making custom screws! With this new found power, we have opted for something that is normally prohibitively expensive to use in a product like this and that is a shoulder screw! In engineering they are used as precision alignment screws where you need something to be placed very precisely and they're also just a great hack for so many applications as they have a precision ground surface.
Here we take advantage of the general hacking side of things and the shoulder here is acting as a bearing surface for the arm and the point where the load is transferred from the arm down into the main body to the chuck and down into the screw. The fit makes for a very efficient load transfer too… There you go, who would have thought so much design goes into a screw!

Barrel Pin
The Mighty Barrel Pin
Similar to the original but upgraded! This has a little spigot on the back to guide the spring and give a bottoming out point so that the mechanism can't be damaged when changing drive direction. This is machined from tool steel first, then hardened through an induction process, which is a pretty cool process where the metal part drops through an electromagnetic induction coil, that in a few seconds brings the metal up to 1200 degrees without touching anything, then it's plugged into a cool oil bath. The action of doing so changes the crystalline structure of the steel making it incredibly hard.
Induction forges are really cool and I recommend checking them out if you don’t know much about them I could go on at length about the process and physics involved but we'd be here all day!

Spring
Springs!
Springs are just fun aren't they? These look quite simple but the thought and testing that goes into getting a spring that delivers enough power for what is needed, but is not too strong making it impossible to pull back with the average human finger is often overlooked!
This one is a compression spring that has been cut down by us to get the right newton meter rate so it looks a bit odd, there are a couple of calculations that we do to get springs in to the ballpark of what we need, but normally end up modifying them by removing some coils like this when the theory meets reality!

Pin Handle
The Pin Handle
We did find that with this design that this part is not 100% necessary as you can pull down the plunger and change direction without this screwed in. But it was a bit on the fiddley side when using it like that, we also have the addition of a slot in the top of it this time so it can be put in easier and removed for maintenance. This was a feature on one of the originals from the 50's so we have just recycled that idea to make things a bit easier for long term maintenance.
Satisfaction time

There it is, the details of every part and finally some assembly satisfaction, courtesy of our advanced simulation department… hopefully this has been interesting, and we've touched on some of the unknown hidden details.

The above is a diagram that lists all of the parts in one place and the associated names. We had some requests last time for something like this, so when taking things apart you would all know what was what, and what piece to ask for when something inevitably rolls under the fridge never to be seen again…
Pocket Driver Schematics - Now Available
Drawings, what a thing ey! … another one requested by you guys are the works drawings. As in our previous project these are now available to buy from us as a digital download or a folded printed version. These are workshop drawings that have been modified so that they can be made at home in a workshop for personal use, and can be used in conjunction with our making of video if you want to make things from scratch as a little side project.

Magnetic Bit Case - The Separator
We have now modelled, played around with, and 3D printed the idea you guys had about getting the driver and magnetic bit kit to sit together snugly and are happy to announce we have a solution for you!

Sticking with the principles of simplicity, we have opted for this simple stabilising washer that sits between the Pocket Driver and the Magnetic Bit Kit.

As you can see the part will just keep the two products together in a nice and neat way, with a loop for attaching a paracord so that the 3 parts can all be kept on a carabiner to keep them together when in use.
As mentioned in previous blog posts we have released this part as an open source design for free. Modelled in Solidworks, it is available as an STL model for 3D printing at home and a STEP for anyone who wants to mod this any further.
You have made it to the end! We hope you've enjoyed this blog post as much we enjoyed writing it. As always if you have any questions for the Team drop us a comment!
1 comment
Barrel extender instructions you must provide, else allen key lost to sands of time.